Showing posts with label techniques. Show all posts

Monday, January 13, 2020

Steampunk Style Tags


"A tramp, a gentleman, a poet, a dreamer, a lonely fellow, always hopeful of romance and adventure." - Charlie Chaplin.


Close up of tag, you can see the foam pads I used for layering.

THE MAGIC OF THREE: "It is said that using three of something adds more interest and power whether it is a conversation, art or numbers."- Jennie AtkinsonI used three tags in different sizes, three medium sized gears, 3 small gears, 3 different colors, 3 reinforcement rings, etc.

My Inspiration was "Live the dream" by Jennie Atkinson, her blog is Jennie live the dream.


Going up. My inspiration for this tag was My take, on Tims tag January 2013 by Inkypinky Craft.

I used the metal gears to dry emboss the background. "Dry Embossing – Also called “relief embossing”, is done by tracing a stencil with a stylus in order to create a raised pattern." - The Paper Mill Store.


Destination Holidays: Clear Transparent Stamp: (15 x 18 cm) Postage Stamps, Film-strip, Postcard, Globe, World Map, Planner Journal Accessories, Destination, etc.


Unknown Acrylic set.

Some of the other supplies that I used were: Tag templates (the tag in the middle of The Tramp is about 6" x 3"), card-stock, cardboard, reinforcement rings, Ephemera (Charles Chaplin), foam pads, ink-pads, Brayer, Memories Mist  (Merlot), Inkadinkado Letter Wood Mounted Stamp, paint, sanding paper, adhesive, paint brush,  Ranger Ink–Perfect Pearls Mists (Gold), toothpick, anchor brads, ribbon, Food die, oil, etc.

 
Hint: I pour my mists over in smaller mister bottles and dilute them with Alcohol. I attach the small misters to the bottles with elastics.

Techniques:

Ombré Background with a Brayer.

“Ombré /ˈɒmbreɪ/ (literally “shaded” in French) is the gradual blending of one color hue to another, usually moving tints and shades from light to dark” –Wikipedia 


Marbleized paper Background Christen Olivarez, Somerset Apprentice by Stampington.


This was the first time that I tried this technique. 


The article suggested I use watercolor paper, which I couldn't find. ;-(


My results after playing around.

YOU MIGHT ALSO LIKE: 


TOKELOSHE ©

Tuesday, October 16, 2018

Make Art.


Dance as if no one were watching.
4"x 6" card.
"Dance as if no one were watching, Sing as if no one were listening, And live every day as if it were your last.' - Anonymous. 

Inspiration and technique: Whimsical water bleaching, Craft Stamper magazine.


Supplies and tools: Stampin‘ Up Dance Sketches Ballerina Ballet 4 Rubber Stamp Set 2003 Wood mounted, Shabby Shutter and Dried Marigold Ranger Tim Holtz Distress Inks, water spray bottle, K and Company - SMASH Collection - Pen and Glue Stick - Black, Ink-pads, Glossy card-stock (I used gloss photo paper) Blending tool (I made my own), Acrylic flower stamp, Rag, Eye-shadow applicators, etc.


Blending tool I made with a Bulldog clip, a safety-pin and felt.


When in doubt...Dance! 
Bookmark. Size: 2" x 7 1/2" 
Inspiration: Design Focus tag, Nov/Dec 2007 Rubber Stamper magazine.


Supplies and tools:, Text Wood mounted rubber-stamp by Inkadinkado,  Stampin‘ Up Dance Sketches Ballerina Ballet 4 Rubber Stamp Set 2003, Autumn (Lady with hat and feather) wood mounted by Acey Deucey, sticky notes( Used as masks, Safron and Rust ink-pads by Stampin‘ Up!, fibers, Bookmark Template, Reinforcement ring, eye-shadow applicator, ink-pads, etc. 

Hint: I wrote the supplies used on the back of the tag.


Play on!8 cm x 16 cm Tag.


Supplies: Prima - Cling Mounted Rubber Stamps - Musicale, Template (Manilla Avery shipping tag) ink-pads, Brayer, card-stock, fibers,  eye-shadow applicators, reinforcing ring, small hole punch, etc. Style: Steampunk.
Technique: Ombré Background with a Brayer.
Theme: Music.

"Ombré /ˈɒmbreɪ/ (literally "shaded" in French) is the gradual blending of one color hue to another, usually moving tints and shades from light to dark" -Wikipedia 

Passion8 cm x 16 cm Tag.


Supplies: Wood Mounted Rubber Stamp Recollections Sheet Music Score, Prima - Cling Mounted Rubber Stamps - Musicale, Template (Manilla Avery shipping tag) ink-pads, Brayer, card-stock, fibers,  eye-shadow applicators, reinforcing ring, small hole punch, Sticky notes (Masking) etc.
Style: Steampunk.
Technique: Ombré Background with a Brayer.


RELATED 

 Blending tools! by The Frugal crafter. 


Tokeloshe ©

Thursday, December 28, 2017

Technique Tags.


"Art makes my Heart soar."


My Inspiration:  Journey Jump Off's by Cristy Riopel  from the "Creating Scrapbooking" Magazine, Summer 2015. 
What a talented artist, who has unfortunately passed away in August 2016. 


  Supplies: Inkadinkado Letter Wood Mounted Stamp, Wings wood mounted stamp, from Our Lady of rubber, Heart shaped stencil, circle shaped stencil, Sunshine daisies clear acrylic stamp by Forever in time, Decorative wavy ruler, Memories™ Mists Pink Lemonade, Ranger Tim Holtz Distress Ink Re-inker 1/2-Ounce dried Marigold, Manilla Tag, acrylic paint, paintbrush, fiber, hairspray, charcoal pencil, small scissors, eye-shadow applicator, stamp-pads, K&Co Smashpen,  baby wipes, etc.


"Precious."
Technique and inspiration "Stampbooking" (Smoosh) by Cathie Allan from "The Canadian Scrapbooker magazine"  Winter 2008/2009. I am very impressed with this technique, which will be handy for making custom patterned backgrounds.

How to Use Studio G Clear Acrylic Stamps.

Supplies: Avery shipping tag, Studio G Clear Acrylic Stamps, off white acrylic paint, Sunshine daisies clear acrylic stamp by Forever in time, ink-pad, eye-shadow applicator, fibers, paintbrush, etc.


"Make Art."

My Inspiration:  "Bible Art Journaling" by Allison Orthner from the "Creating Scrapbooking" magazine Summer 2017.


Supplies: Victorian angels wood mounted rubber-stamp by Rubber Stampede, Memories™ Mists Blue berry shake, Memories™ Mists Pink Lemonade, Modge Podge mat by Plaid, small scissors, acrylic blocks (See hints at the bottom),  K & Company Smash-pen, Foam brush, card-stock, Decorative wavy ruler, Text from an old book, Baby Wipes, fibers, paintbrush, etc.

Technique: Painting with Baby Wipes.


"Time to Fly."
My Inspiration: "Bible Art Journaling by Allison Orthner from the "Creating Scrapbooking" magazine Summer 2017.


Supplies: "Time to Fly" cling stamp by Paper relics, Avery shipping Tag, Memories™ Mists Blue berry shake, Ranger Tim Holtz Distress Ink Reinker 1/2-Ounce Spice Marmalade and Shabby Shutters, Modge Podge, mat by Plaid, small scissors, acrylic blocks (See hints at the bottom),  K & Company Smash-pen, Foam brush, cardstock, Decorative wavy ruler, Text from an old book, Baby Wipes, fibers, etc.


Technique:
Painting with Baby Wipes-"Bible Art Journaling" by Allison Orthnar from the "Creating Scrapbooking" magazine Summer 2017.


"Dream On."


Supplies: Prima - Wood Mounted Stamp - Dream On Rusty Cog by Finnabair, All Night Media Crackle Finish Background Wood Mounted Rubber Stamp, Tsukineko Walnut Ink Antiquing Solution Spray, 2-Ounce, Avery shipping tag, warm white acrylic paint,  acrylic block, emery boards, fibers, paintbrush, etc.

Technique:  "Stamping With Mists" from Ideas for scrapbookers by Nancy and masking with Sticky Notes.


Hints
: I use Acrylic picture frames from the dollar store.


 I bought small acrylic picture frames and acrylic blocks at the dollar-store, to which I attach my acrylic stamps, I have so many that I don’t have to remove the stamps from the ones I use regularly. The ones that come in sets, are in zip-lock bags.

You might also Like: 


Altered Tags.
Click above for more.

I ♥ Tags Click here for more tags.


Tokeloshe©    

Monday, June 7, 2010

Hand decorated paper

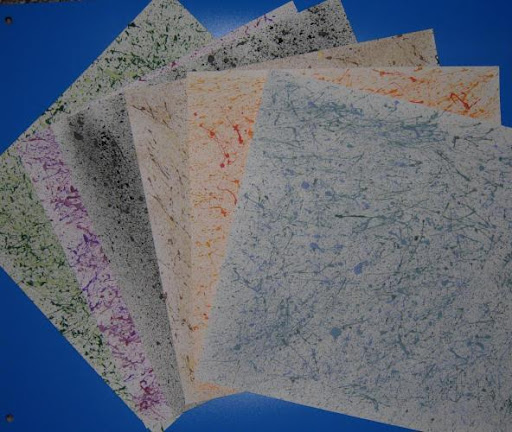
I used a toothbrush and three different coordinating colors of Decoart Americana Acrylic Paint to splatter paint onto white card-stock.
“Although not labeled as such, Deco Art Americana paints are acid-free.

(Info from Deco Art’s chemist).” – Rebecca Baer


A good book that I can recommend is  "Painted Scrapbook Pages" by Mylinda van Zee 
She also has a motivating Blog and website.

I made four pages of each, here you can see the orange example I used in this Fall layout.


 Here I played around with watercolors and rock-salt.


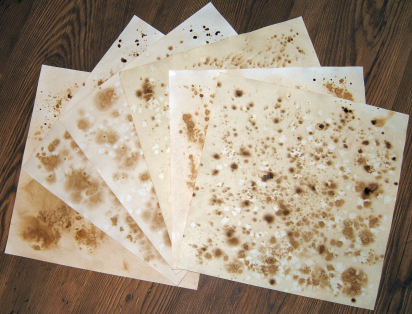
 Distressing/Antiquing with Instant Coffee
Color with water and instant coffee, sprinkle lightly with fine instant coffee and add rock salt.
Note: Black coffee registers at 5.0.


From the book "Tantalizing Textures" By Trudy Sigurdson 


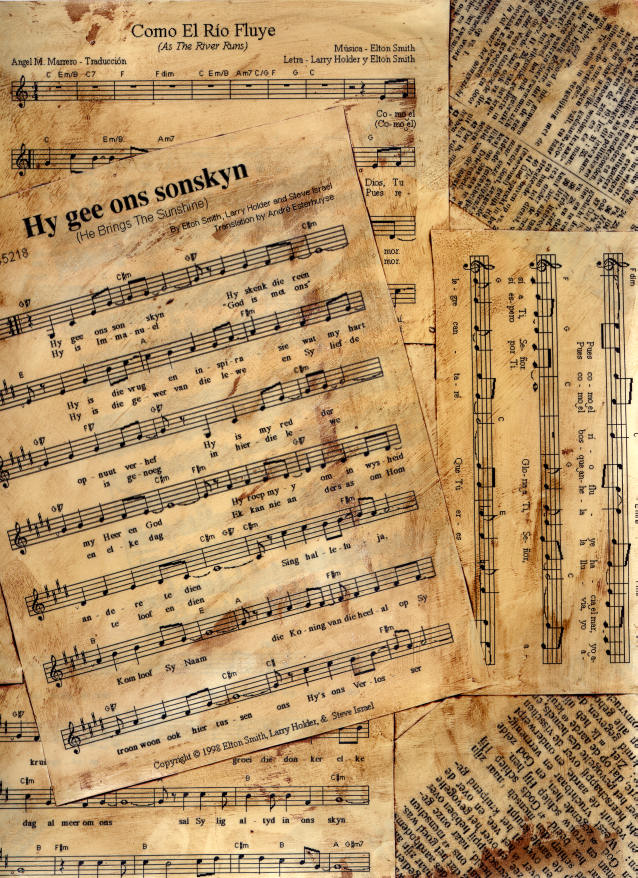
Collage


"A collage (From the French: coller, to glue) is a work of formal art, primarily in the visual arts, made from an assemblage of different forms, thus creating a new whole.
A collage may include newspaper clippings, ribbons, bits of colored or hand-made papers, portions of other artwork, photographs, a piece of moss or even a dead mole and other found objects, glued to a piece of paper or canvas. The origins of collage can be traced back hundreds of years, but this technique made a dramatic reappearance in the early 20th century as an art form of novelty.
The term collage derives from the French "coller" meaning "glue".[1] This term was coined by both Georges Braque and Pablo Picasso in the beginning of the 20th century when collage became a distinctive part of modern art." - Wikipedia

Materials:
Cream card-stock
Matt Modge Podge by Plaid

Foam brush
Music, text, clipart, etc. printed on cream acid-free paper
Brown shoe polish

Method:
Print music, clipart, text, etc. onto paper.
Cut or tear into strip and plan placing.
Cover the card-stock with Modge Podge using the foam brush Layer paper onto cardstock.
Cover with Modge Podge
Work shoe polish into paper and especially into joins, I used my fingers otherwise it rubs off.

Cover with Modge Podge
Notes:
I use a foam brush as a brush with bristles leaves fine lines.
I have tested Modge Podge and it is acid free.
I don't think shoe polish is acidfree, but the layer of modge podge should help, one can always add acid reducer or cover the paper with vellum for a muted look.


 Here you can see it on my planning Magnetic Board
Family Gathering
Please click on thumb-nail


 Here is a tag which I made the same way.
Timeless
You can see the brush strokes.
Please click on thumb-nail

I also used a Collage background for Dad


post signature

LinkWithin

Related Posts with Thumbnails